本文介绍Android MediaCodec和Codec 2.0的基础知识。
MediaCodec概述
主页:https://developer.android.com/reference/android/media/MediaCodec
MedicCodec是Android提供的底层多媒体编解码API,它是Android底层多媒体基础设施的一部分,通常与MediaExtractor, MediaSync, MediaMuxer, MediaCrypto, MediaDrm, Image, Surface, and AudioTrack等一起使用。
工作流程

工作生命周期

使用例子
异步API使用流程
1 | // 1. 创建 MediaCodec 的实例 |
同步API使用流程
1 | // 1. 创建 MediaCodec 实例: |
MediaCodec Code Flow
MediaCodec创建

findMatchingCodecs
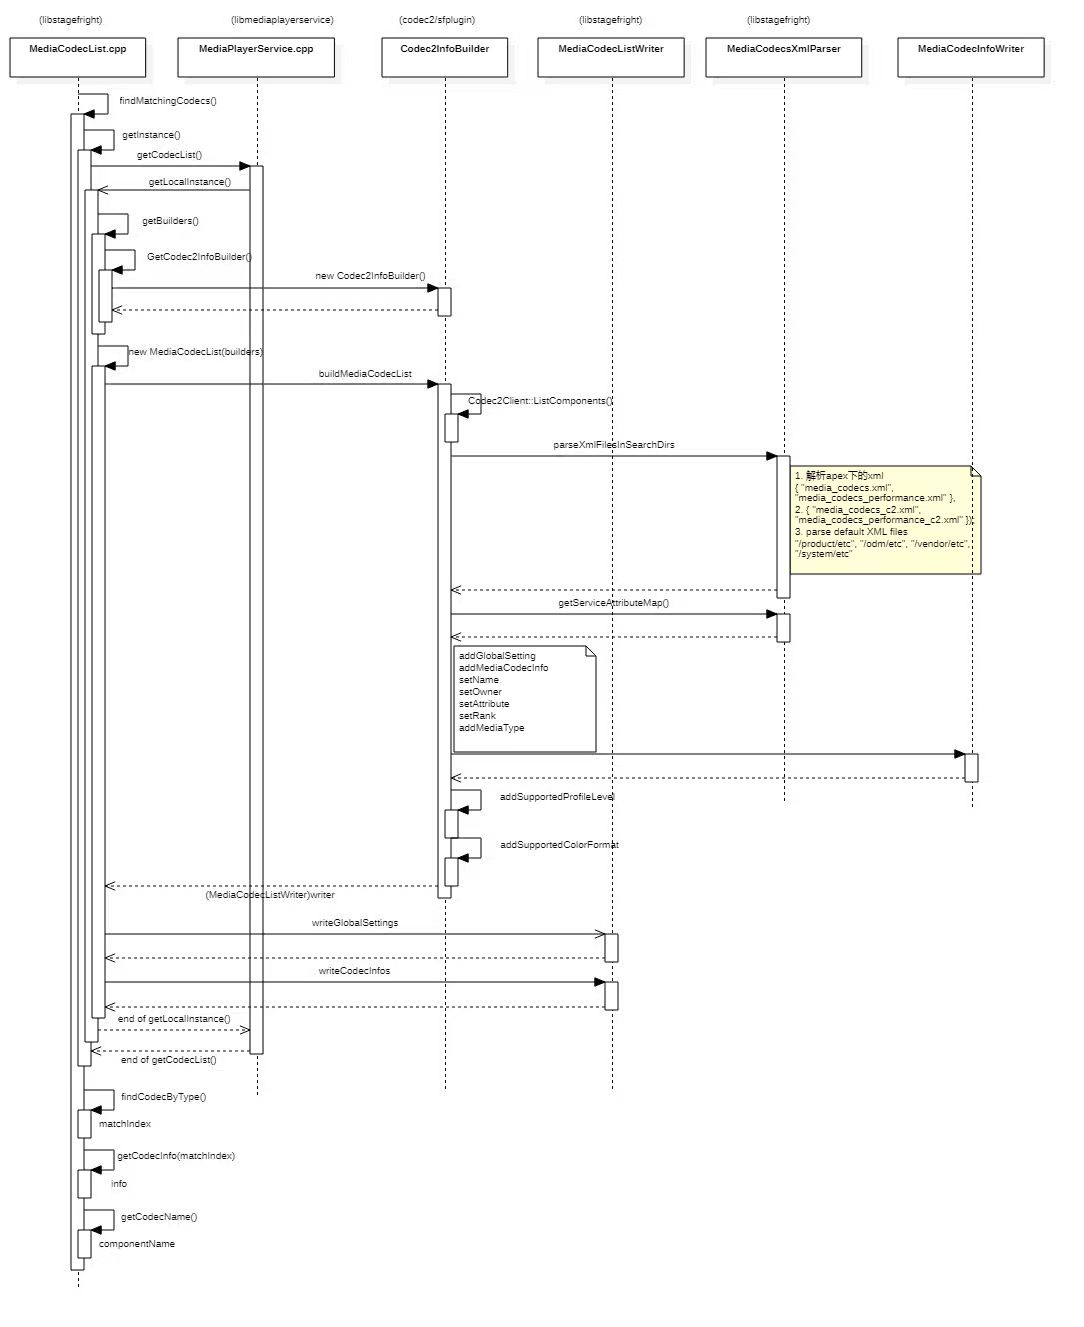
查找匹配的codec前,首先要获取MediaCodecList的实例
MediaCodecList::getInstance()会调用MediaPlayerService的getCodecList()方法来获取list,但实质还是获取MediaCodecList本地的对象(原因是MediaPlayerService也需要使用到MediaCodecList的对象)
有两种codec,一是OMX的codec,二是Codec 2.0的codec。C2通过解析xml构造相应的codec list。
构造好codec list之后便可以通过查找得到想要的match index、codec info和component name。
Configure
MediaCodec的configure()是通过发消息给自己的looper执行来完成的
message为kWhatConfigure
message携带的消息包括 : “format”,”flags”,”surface”,”encoder”,”crypto”,”descrambler”,”metrics”
metric中包含了profile,level,encoder,codec,mode,width,height等信息
MediaCodec初始化
前面MediaCodec创建的时候,new了一个MediaCodec对象,然后在codec的init中传入componentName参数进行实际的初始化。
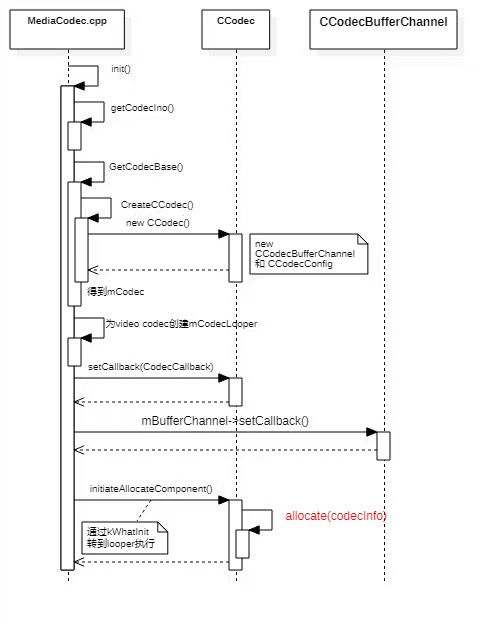
MediaCodec的初始化init()时,会根据codec info创建CCodec,这个CCodec才是C2的实例。
new CCodec的时候只是创建了buffer channel和config,而实际的分配资源是通过发kWhatInit消息,转到MediaCodec线程执行的,核心是CCodec的initiateAllocateComponent()函数
initiateAllocateComponent()的关键则是发消息执行allocate()
CCodec::Allocate

创建一个Listener
创建服务,得到一个codec2client //厂家自研
创建服务组件component
回调结果
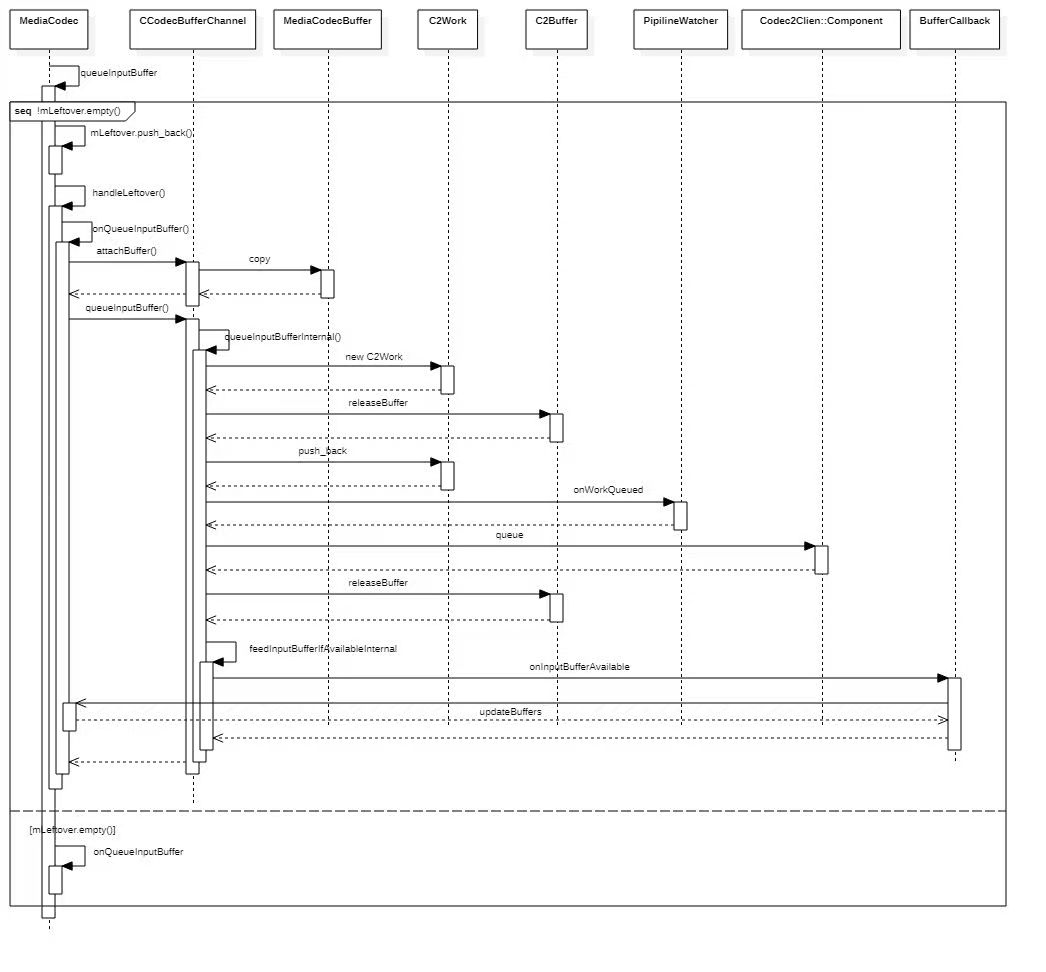
数据处理流程
End of Stream
当输入达到数据末尾时,在queueInputBuffer()的调用中指定BUFFER_FLAG_END_OF_STREAM标志来向编解码器发出结束信号。
解码器将继续返回输出缓冲器,直到最终通过dequeueOutputBuffer或onOutputAvailable中发出输出流结束标志。
输出Surface
一般使用ByteBuffer模式来输出,当使用ByteBuffer模式时,可以利用Image类或通过getInut/OutputImage(int)方法访问到原始数据帧。
原始数据也可以输出到Suface,这会提高编解码器的性能,因为Surface直接使用本地视频数据缓存。当输出到Surface时,输出缓冲区将不可访问,并表示为空值。
使用输出Surface时,可以选择是否在Surface上渲染每个输出缓冲区:
不渲染缓冲区:调用releaseOutputBuffer(bufferId, false);
使用默认时间戳渲染缓冲区:调用releaseOutputBuffer(bufferId, true);
使用特定时间戳渲染缓冲区:调用releaseOutputBuffer(bufferId, timestamp);
- 当输出到Surface时,Surface可能会丢弃过多的帧。在Build.VERSION_CODES.Q之后可以通过配置MediaFormat#KEY_ALLOW_FRAME_DROP为0,从而不丢弃帧,而是阻塞解码器。
Codec 2.0整体框架
Google在Andoird Q上推出的Codec2.0,旨在取代ACodec和OpenMAX。
C2优点:
更精确的帧控制
启动延迟低,支持播放过程中分辨率变更
减少内存分配占用(零拷贝)
先进的资源和配置管理(通过C2ComponentStore和C2ComponentInterface预先确定给定配置的组件)
代码位置:
android/frameworks/av/media/codec2/
接口位置:
android/hardware/interfaces/media/c2/aidl/
C2进程启动
init进程解析/vendor/etc/init/vendor.qti.media.c2@1.0-service.rc/vendor/bin/hw/vendor.qti.media.c2@1.0-service 启动c2进程,并把自己注册到hwservicemanager中去。
这个”vendor.qti.media.c2@1.0-service“也是prebuilt的bin。
C2 APIs
C2ComponentStore
C2ComponentInterface
C2Component
C2Work
C2AllocatorStore
C2Param
C2类图

CCodec
最顶层的类是CCodec,对接到MediaCodec。MediaCodec初始化时就会创建CCodec实例,得到mCodec。
CCodec主要实现编解码功能,它主要与三个类打交道,包括CCodecBufferChannel、Codec2Client以及CCodecConfig类。
Codec2Client
Codec2Client继承自Codec2ConfigurableClient,具备参数交互的操作接口。
Codec2Client本身提供与组件创建相关的接口,它可以创建component和interface,可以获取ParamReflector。
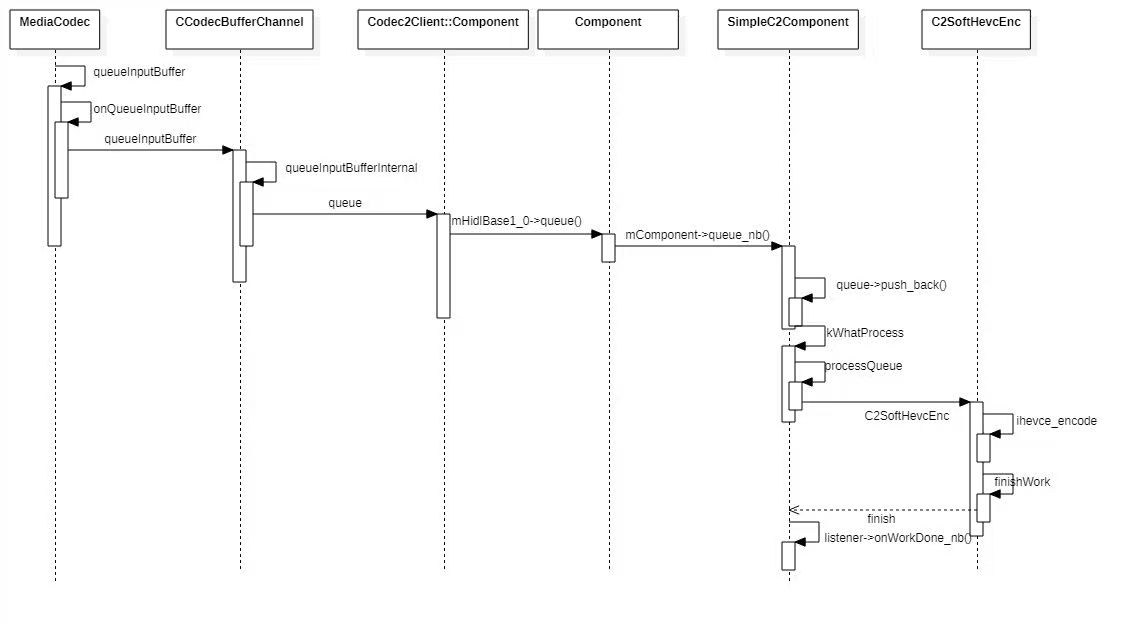
在CCodec的allocate()函数中会调用Codec2Client::CreateComponentByName()这个静态方法,创建Codec2Client::Component对象。
Codec2Client的成员mHidlBase1_0保存了ComponentStore,用来创建component和interface
Codec2Client::Component
Codec2Client的成员mHidlBase1_0保存了IComponent的客户端代理
Codec2Client::Component的主要功能通过mHidlBase1_0来实现
Codec2Client::Component的初始化:
1 |
|
Component
Component实现了IComponent的方法
Component依赖C2Component这个抽象类来实现功能
C2Component的具体实现是SimpleC2Component
SimpleC2Component
- SimpleC2Component类实现的是各个组件的共同操作,相当于一个公共适配层,每一个组件都继承于SimpleC2Component类。
初始化流程

解码流程
Codec 2.0缓存管理
缓存整体图
Java:ByteBuffer
JNI: MediaCodecBuffer
BlockPool:Block
BufferPool :InternalBuffer
Allocator:Allocation C2Buffer/WorkBundle <-> Component
Kernel:DMA-buf Gralloc
如何做到零拷贝:
Java端需要内存在native生成
client native端的MediaCodecBuffer与C2Buffer共享底层的Block
kernel内存同事映射client和component端进程空间
数据结构

关键数据结构介绍:
MediaCodecBuffer
MediaCodecBuffer的实现是通过ABuffer实现的;
MediaCodecBuffer有一个asC2Buffer() 方法,可以转换成C2Buffer。
Codec2Buffer
- 继承自MediaCodecBuffer
GraphicBlockBuffer和LinearBlockBuffer
它们是MediaCodecBuffer的子类
静态方法Allocate():传入C2LinearBlock,创建LinearBlockBuffer。
asC2Block():通过C2Buffer::CreateLinearBuffer由mBlock构造出一个C2Buffer。
ABuffer里面的data是从block获取的。
所以这个LinearBlockBuffer的关键依赖是传入的block
1 | std::shared_ptr<C2Buffer> LinearBlockBuffer::asC2Buffer() { |
小结:这些是client端的buffer,它们依赖构造的时候传入block。
C2LinearBlock
继承自C2Block1D
map()方法返回一个write view,
它使用父类mImpl的C2LinearAllocation来获取base地址,再用base地址构造write view
C2Block1D
- C2Block1D依赖C2Block1D::Impl, C2Block1D::Impl继承自_C2Block1DImpl
- _C2Block1DImpl是所有1D block和view implementations的基类
_C2Block1DImpl
- mAllocation,分配器,需要在构造的时候传入C2LinearAllocation(接口类)
- mPoolData,保存了PoolData
C2LinearAllocation
这个是接口类,定义了如何分配内存
实际负责分配的是它的子类:C2AllocatorBlob,C2DmaBufAllocator,C2AllocatorIon。它们依赖BufferAllocator和C2Allocator::id_t来完成内存的分配。它们里面也保存着C2Handle。BufferAllocator 这些是系统的内存分配器
小结:block是实际的内存块,它们需要内存分配器来完成分配
C2Buffer
buffer的基类,它对底层的buffer对象(native buffers, dma buffers, ion buffers)持有一个单引用;
data() 方法返回C2BufferData;
提供两个静态方法来实例化对象,不能自己构造。
C2BufferData
- 缓冲区的主要非元数据,也就是buffer的数据主体;
- 构造时需传入C2ConstLinearBlock的引用
小结:可以看到C2Buffer也是依赖传入block,所以C2Buffer和MediaCodecBuffer是共享底层的缓存的。
简化的缓存关系图如下:

跨进程管理缓存对象生命周期
BufferPool里面的内存对象需要被多个进程使用和管理
d通过FMQ发送的命令,命令有postBufferStatusMessage(包含send、receive),postBufferRelease等等,发送命令会导致Buffer的状态变更,postBufferRelease会导致InternalBuffer->mOwnerCount减1,为0进入到free的集合mFreeBuffers(下次重新使用,以免再次open和mmap系统调用)。

输入缓冲区的申请和释放
什么时候申请输入缓冲区?

Codec->start()的时候申请输入缓冲区,关键是调用LinearInputBuffer的createNewBuffer,Alloc时通过调用pool的fetchLinearBlock(),实际从bufferPoolManager去做实际的allocation内存分配动作。
从BufferPool里面分配内存,得到cHandle和bufferPoolData;再间接得到alloc和poolData,然后用它们作为参数CreateLinearBlock,得到block。
LinearBlockBuffer::Allocate(format, block)就可以用刚得到的block创建LinearBlockBuffer。
最后会调用FlexBuffersImpl的assignSlot分配一个slot。
什么时候再申请MediaCodecBuffer?
-MediaCodecBuffer在queueBuffer到Component之后,会销毁掉,这样导致可用的MediaCodecBuffer减少
-会调用CCodecBufferChannel->feedInputBufferIfAvailable()重新去申请MediaCodeBuffer
-申请的时机:当queue一个buffer之后,立即申请;当处理完一个输入缓冲,得到输出缓冲后也会调用
什么时候生成并使用C2Buffer?

什么时候销毁C2Buffer?
C2Buffer分为client侧和Component侧。
输入缓冲区解码完成后,也就是对应的输出缓冲创建以后,这时候不再需要输入缓冲,Component侧会调用IComponentListener->onInputBuffersReleased(),通知客户端销毁C2Bufer。
client的PipelineWatcher把C2Buffer移除。
输出缓冲区在哪里创建?
输出缓冲在HAL/Component侧创建的,创建好之后给内核/decoder使用,内核使用的输出缓冲类型v4l2_buffer
通过C2BufferQueueBlockPool::fetchGraphicBlock()获取C2GraphicBlock,根据C2GraphicBlock生成vcodec::Buffer。
当调用VCodecV4L2::pushOutputBuffer(),V4L2Device->getAvailableOutputSlot(),取得v4l2_buffer的指针,然后用上面的vcodec::Buffer赋值v4l2_buffer。
参考链接